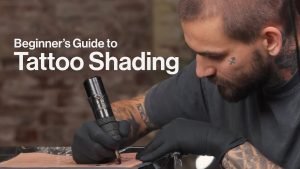
In this tattoo shading tips for beginners lesson, Jono Smith, explains the most common mistakes made when apprentices learn how to tattoo black & grey. After going through each mistake & showing you tips how to rectify them, he performs a live demonstration on his own skin, firstly shading deliberately making mistakes and then performing the same tattoo shading it correctly.
This video is a must see for any beginners wanting top tips to learn how to tattoo soft black & grey shading!
Video Transcript:
Does your tattoo shade look red, angry and patchy? Well, if it does guys, this is the video for you, because today, I’m going to be covering five of the top reasons of why this happens, but not only that; I’m going to be doing a side-by-side comparison on my own leg.

First of all, tattoo in the red, angry patchy shade and then fixing all the problems and doing some nice smooth black and grey [ Music, ]
Hey everyone! Welcome to this video so today, yet again, I’m offering some skin to the youtube gods. But more importantly to you guys, the subscribers to give you guys the best opportunity to take in and grasp and really understand what I’m trying to teach you.
I can’t physically take your hand. So this is the next best thing where I can show you the theory and then also a live demonstration.
So, coming up in this video, I’m gonna be covering the five common mistakes made which, when you guys try to tattoo black and gray and you can’t understand why the skin is going red and patchy and angry looking, but more importantly, guys. I’m gonna be showing you how to fix these five common mistakes and then I’m gonna be tattooing my own leg.
I’m purposely making these five common mistakes just to show you how bad rough and red the skin can actually go. And then, at the side of this, I’m going to be comparing it with the five mistakes fixed and showing you some nice soft, black and grey shade.
So quickly before we get into this video guys. If you want to walk away from this video with the confidence to really sit down and be able to shade black and grey and put those soft shades in the skin, I strongly recommend that you don’t skip any part of this video, because this video, like a Lot of my previous videos, it builds on information as we go along. So if you were to skip let’s say halfway through this video, it might not make a lot of sense to you because you haven’t watched it in its entirety. So stick eight to ten minutes aside, watch it in its entirety to get the most out of it.
So with all that said, guys, sit back, relax enjoy and let’s get straight into it.
So this first mistake self-explanatory: if the machine is running too fast or your hand speed too slow, then technically the skin can be overworked in a very short space of time. In this highly exaggerated example, what we’re trying to achieve is for the ink to be placed into the skin in a nice even uniform pattern. It will compare this to a machine running too fast. The needles begin to make multiple punctures over the same area. Trying to shade with a machine running like this will quickly begin to overwork the skin.
To fix this, we simply slow the machine down or speed up your hand speed. Most shading machines are set up to make the needles hit the skin a lot softer. If your machine is set to hit hard while shading, this can quickly begin to overwork the skin if you’re not too careful. So it is important to set the machine to hit softer when the machine has the option to do this.
Dedicated shader machines do tend to come already preset with a soft hit, for example like the Bishop Shader Wand. Now, if you don’t understand fully what I’m talking about when I mention the hit of the machine, this is a huge subject which I cover in depth in another video covering everything you need to know about the hit and the bug of a machine. So if you haven’t seen that already I’ll stick that card up on the screen, if you click that you can watch it at the end of this video [ Music, ], [ Applause, ]
Incorrect pressure, in my opinion, is one of the biggest culprits for ruining shade on tattoos and also overworking the skin. Ss a noob to tattooing, I had a predetermined idea in my head as to how much pressure I should have had on the machine when landing the needles in the skin for shading.
So let’s, for example, say on a scale of one to ten, with one being almost not touching the skin, with hardly any pressure at all and ten being the opposite end of this scale. By putting quite a lot of pressure down on the machine, pushing the needles into the skin, then in my untrained newbie mind, my expectation of the needle pressure was around about a six on this scale. But this was way off the mark and based on this scale, the pressure I should have been applying should have been around about a two or a three.
This was a huge learning curve for me in the beginning and one that I had to constantly remind myself over and over again, not to put too much pressure down on the machine when shading.
If you are unsure how much pressure to apply to the skin when shading, it makes much more sense to start at one on the scale and gradually build from there adding slight increments of pressure until you find the optimal amount that puts shade into the skin.
If you apply too much pressure, it will overwork the skin in a very short space of time and make your shade look, patchy and red.
So the next common reason for patchy looking shade is the wrong choice of gray wash. Now, this is something you don’t usually hear people talk about, but it’s a massive contributor to redness of the skin.
Now what I mean by wrong choice of grey wash, is this…
Grey wash, whether you make your own or you buy pre-mixed, you’re most likely going to have a few different shades as opposed to just the one. So let’s, for example, say you’re going to do a black and gray tattoo and you’ve obviously got your ink cup full of black and then you’ve got three cups of gray wash all different shades.
So in this example we’re going to say, light medium and dark. The best way to approach a tattoo is to match the desired shade of your reference image with the minimal amount of passes over the skin with the needle. So let’s say you want to tattoo this dark looking shade on the design, you wouldn’t use your light grey wash on this from the palette.
Why? Because it’s going to take far too many passes on the skin, with a needle before you even get close to your desired shade. Which in turn means you would have probably overworked the skin before you’ve got a shade even close to looking as dark as the shade in the reference image.
So in this example, by choosing the dark grey wash, this will allow you to reach the desired shade with much fewer passes over the skin with the needle, and with fewer passes you’re much less likely to overwork the skin and therefore much less likely to make the skin red and angry looking [ Music ]
Technique is probably the most important element to get right. In previous videos I’ve described the shading technique like a plane coming into land on a runway, touching the runway and taking off again. I’ve also compared it to a golfer swinging, a club at a golf ball, and another great example simply put is a pendulum swinging from a clock.
Whatever analogy you use to learn this technique, the most important thing is to remember to make a constant fluid motion that doesn’t stop or change pace mid movement, but maintains a nice uniform motion throughout the full movement where the needles sweep into the skin and then leave the skin whilst maintaining a nic even speed and motion.
The stretch is so important and key in achieving smooth shade. When the skin is stretched it allows the needles to enter the skin and lay down the ink evenly spaced which, when combined with all the other elements, such as the machine not running too fast, correct ink selection, correct pressure, correct technique, helps to create nice, looking even blends.
Contrary to this, if the skin is unstretched, the needles can actually bounce off the skin at random intervals, which in turn creates patchy, weak looking shade.
So coming up in this next section guys, it’s the part that you’ve all been waiting for. I’m purposely gonna make all these mistakes that I’ve just spoken about on one part of my leg, and then I’m gonna fix all these mistakes on another part of my leg and show you just what a massive difference it makes to your tattooing when you fix and combine all these elements.
Okay guys. So the first thing I’m gonna do is turn the machine right up to 13 volts, which is way too fast for shading. I’m using an 11 curve mag an mvgen2 one. This is my leg in question. Those four lines there, if you haven’t seen it already, I tattooed some blowouts on my leg, just to explain what blowouts were but, I’ll stick that card up on the screen if you haven’t seen it, if you click that you can watch it at the end of this video.
So all I’m doing now is it is basically making all the mistakes we’ve covered in the video. My techniques wrong: I’m not stretching the skin, the machine’s running too fast. So I’m just going to speed it up a bit now, because I don’t want this video to run longer than it has to do. And I’m wiping off there and you can see already if I was tattooing this on a client with a design, I’d be in a lot of trouble now. You can see the starting to get blood coming out of that. You can see it’s angry, there’s nothing smooth about this at all.
Now, one of the mistakes I purposely left off the list when tattooing this first bit of attempted shade was the pressure. So now I’m going to show you what the results are like when you apply excessive pressure to the machine. Just shading up there and you can see already the skin, it’s not really taking the ink. It’s basically burst the surface of the skin and I’m just getting blood.
Now again, if you were doing something like a portrait, a realism or anything like that. Where you require that delicate shade, then this tattoo is completely ruined and you’re gonna have a very, very angry client.
So now I’m gonna fix all these mistakes, I’m turning the machine down to eight volts. This is a bishop one by the way, which is a dedicated shader machine and I’m just doing those nice strokes, fluid motions and you can see: there’s no redness there. It’s just going onto the skin just like pencil on a piece of paper, nice and smooth.
So I’m just gonna wipe that bit off now and what you do with shading is you’re aiming to build up the layers, you’re never going to hit the shade that you need in one pass with the needle.
So what I do is build on the layers. So this is an example of some really light soft shade and then I’m gradually going to darken the shade up as we go along. Because I’m not actually tattooing a design on my leg, it’s hard to put in context what you’re actually seeing here. So I think the best way to explain it and to visualize it is just to go through different levels of shade, starting with a really light shade and then gradually build into a really dark one.
Just wipe that off there and you can see no redness. Just nice soft shade building up. You can see that movement with the needle there at the end of the needle it’s just gliding onto the skin. It’s barely touching the skin. Again, if I refer back to that pressure chart which we just spoke about, this will be about two: the amount of pressure I’m applying to this. Just enough pressure to get that shade into the skin.
So now I’m starting to darken up the area, so this would be more of an effect if I was doing let’s say a portrait and I was coming out of a really dark area. Like an an almost black area and I wanted that really really dark shade, but still wanted a soft edge, a soft transition coming from it. So this is what I’m showing you now, an example of this [ Music ].
So now, I’m just shading across in the other direction. What I’m actually doing on this part is back shading, and this is perfectly fine to do. So basically, all you’re doing is, instead of you, pushing the needles forward, you’re sweeping them backwards. I found I get some really nice results doing shading this way.
Now, you’re really beginning to see the comparison between the two tattoos. I mean, if you just look at that redness and that blood on the first tattoo. And the first one, it only took me literally one to two minutes to do – and it was quite painful in comparison to that this second one, I’m doing I could sit and do that all day. It didn’t cause me any problems at all. And again I’ve not changed the machine. I’ve not changed the needles. It’s the exact same setup, but it’s just not making those mistakes which we’ve covered in the video.
I’m speeding up now and I’m really starting to darken up the tattoo now and you can see those edges, nice and soft, just transitioning off from the dark to a Medium gray. The ink I’m using for this is Silverback XXX series. So for the really light parts it was the single X and then for the obviously the darker parts and going into the triple XXX.
And then that concludes our tattoo. You can see the side by side comparison there and the first one I mean, the only thing I can say about that is just a mess, but obviously the second one speaks for itself. We’ve gone through light to medium to dark shades. We’ve not caused the skin any problems and the ink’s just gone in there and I’m certain that will heal out with no problems and just sit in the skin, nice and soft.
So I’m quickly going to show you some examples of three tattoos that I’ve done, which incorporate all these techniques which I’ve just showed you on my leg.
The first one, this dog included a lot of medium to light shades in this one, then sort of framed it off with a really dark edge to emphasize the white fur. Then we’ve got the eagle on the chest: there again lots of medium to light shades in the feathers there to give the impression that the feathers are white, but the only white that was actually used in this tattoo was very, very minimal highlights in the eye around the beak, but again this is the effect that you can achieve when you’re competent at putting those really light shades in without getting that angry red looking skin.
And finally, we’ve got the badger. I’ve included this one, because this one’s got a good contrast between really dark shades and really really light ones as well. And you can see them all working with each other to make the tattoo pop.
Thank you so much for watching this video guys, and it really does mean the world to me if you’re taking anything from this video at all, take a second out right now smash that, like button, let me know that you’ve liked it, but more importantly, that guys every like on the videos really does help the channel. It helps the channel grow and in return it makes me be able to make more content for you guys, as subscribers. Don’t forget, to subscribe to the channel. If you’ve already subscribed, it’s really important to check that notification bell to stay up to date for my latest uploads. Well, that’s it guys! Thank you again so much for watching and I’ll see you in the next one.